![]()
Facebook recently implemented an updated version of the Custom Audience and Conversion pixels. Naturally I wanted to try out the new pixel knowing that eventually I would need to migrate to using it, instead of the older pixels. Easier said then done: there was/are not a lot of clear step-by-step guides explaining how to install it on a Shopify store and track conversions.
I got frustrated enough after reading a couple of really bad examples/guides (some totally, totally inaccurate), so I decided to write this post on how to install the new pixel and save some others the frustration, after my own trial and error. The process is really simple and I’ll fully explain it below.
But first: Why a new pixel?
Well, previously there were two different types of pixels available on Facebook and each one had a different function:
- Audience Pixels: These are used to create custom audiences that you can target ad campaigns to.
- Conversion Pixels: These pixels had a double function: helping you optimize advertising campaigns and tracking conversions from your campaigns.
Over time Facebook has continued to improve their advertising platform with new features and the new Facebook pixel is designed to help you leverage some of those new ad products and opportunities they have made available.
With the old pixels you would have to add lots of different conversion pixels in your checkout pages in order to effectively track your campaigns. Anyone that has done this knows this is not a feasible long term option:
- Pixels can conflict with each other
- All that code can and will slow down your website
- Keeping track of each individual pixel across a multi-person team can lead to lots of operational mistakes.
Facebook’s upgraded pixel solves all those issues. Essentially it is the “one pixel to rule them all”

The new pixel includes a number of improvements and new features. The most significant ones are:
- Audience and Conversion pixel are one: There’s no need to use different pixels to track audiences and conversions.
- The new pixel loads faster.
- Better event tracking: The new pixels allow tracking up to 9 different standard events, each of them with a set of parameters. In addition you can set an unlimited amount of “custom” events for more granular tracking.
- Pixel sharing: Sometimes you may want to share pixels with another company (common when working with agencies or as part of a business collaboration between different companies.) These pixels can be easily shared with other Facebook Ad Accounts.
Installing the new Facebook Pixel in Shopify
Here’s how to setup a basic implementation of the new Pixel in Shopify that allows you to create a custom audience of website visitors and also track any conversions.
1. Create your new pixel in your Facebook Ad Manager – give it a unique name.
![]()
2. Grab your new pixel code. It will look very similar to this:
<!– Facebook Pixel Code –>
<script>
!function(f,b,e,v,n,t,s){if(f.fbq)return;n=f.fbq=function(){n.callMethod?
n.callMethod.apply(n,arguments):n.queue.push(arguments)};if(!f._fbq)f._fbq=n;
n.push=n;n.loaded=!0;n.version='2.0';n.queue=[];t=b.createElement(e);t.async=!0;
t.src=v;s=b.getElementsByTagName(e)[0];s.parentNode.insertBefore(t,s)}(window,
document,'script','//connect.facebook.net/en_US/fbevents.js');
fbq('init', %u2018your_pixel_id');
fbq('track', "PageView");</script>
<noscript><img height="1" width="1" style="display:none"
src="https://www.facebook.com/tr?id=your_pixel_id&ev=PageView&noscript=1"
/></noscript>
<!– End Facebook Pixel Code –>
(Important note: “your_pixel_id” in my code above represents your unique facebook pixel id number – you will not need to touch our modify this section of your code when you grab it from facebook!)
3. Install your Facebook Pixel code just before the </head> of your Shopify websites code. In Shopify you can find this in your theme.liquid file.
![]()
4. Save the change you made to theme.liquid
That’s it! Your basic pixel that creates a custom audience of your website visitors is now installed on your Shopify store.
Now let’s get that conversion tracking working.
In this step you need to modify your pixels code a little bit to add an event and also grab some dynamic information from Shopify to track purchases in your store.
You’ll need to add one new line of code to your Facebook Pixel to get it to track purchases:
fbq('track', 'Purchase', {value: '{{ subtotal_price | money_without_currency }}', currency: 'USD'});
Your final pixel that tracks purchases/conversions will end up looking like this:
<!– Facebook Pixel Code –>
<script>
!function(f,b,e,v,n,t,s){if(f.fbq)return;n=f.fbq=function(){n.callMethod?
n.callMethod.apply(n,arguments):n.queue.push(arguments)};if(!f._fbq)f._fbq=n;
n.push=n;n.loaded=!0;n.version='2.0';n.queue=[];t=b.createElement(e);t.async=!0;
t.src=v;s=b.getElementsByTagName(e)[0];s.parentNode.insertBefore(t,s)}(window,
document,'script','//connect.facebook.net/en_US/fbevents.js');
fbq('init', 'your_pixel_id');
fbq('track', "PageView");
fbq('track', 'Purchase', {value: '{{ subtotal_price | money_without_currency }}', currency: 'USD'});</script>
<noscript><img height="1" width="1" style="display:none"
src="https://www.facebook.com/tr?id=your_pixel_id&ev=PageView&noscript=1"
/></noscript>
<!– End Facebook Pixel Code –>
(Important note: “your_pixel_id” in my code above represents you unique facebook pixel id number)
Once you’ve modified your pixel to correctly track purchases, you need to get this modified pixel installed in Shopify.
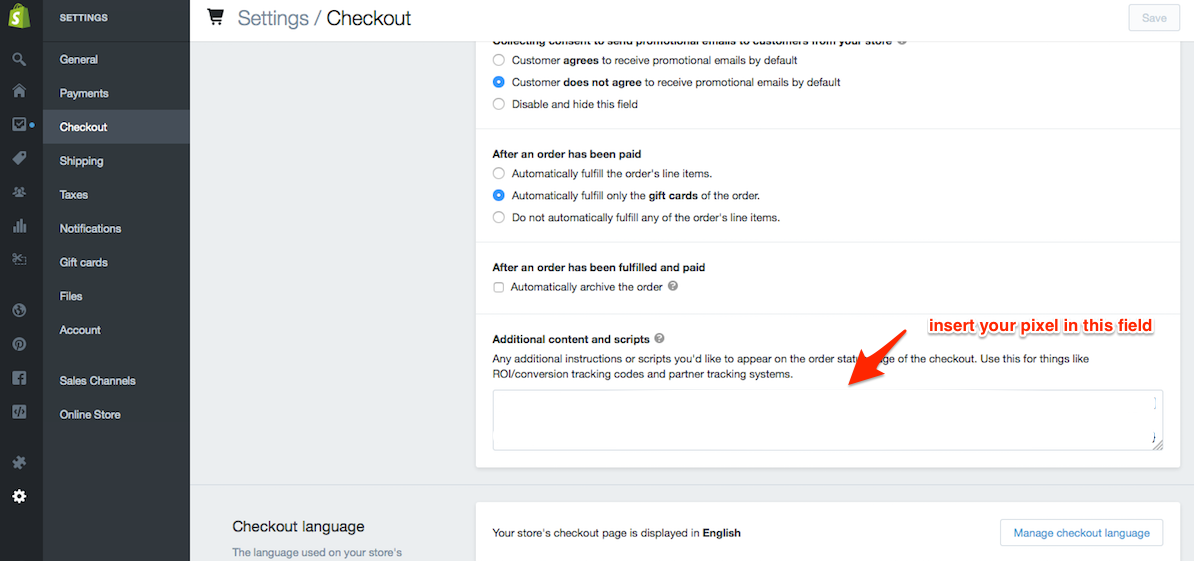
To do that: Head into your Shopify Store settings, find your “Checkout” settings, and then find the “Additional content and scripts” section of your checkout page (pictured below), and drop in the modified pixel you just made above into that field, and save the change.

You’re done!
Now that you have all the new code installed in your Shopify store. Head back over to Facebook and grab the Facebook Pixel Helper so you can test the pixels and make sure they are properly installed/working on your page.
Are you using the new Facebook Pixel? Do you plan to? What problems have you run into with the new Pixel?
The new version of the Facebook pixel has some great features that allow for a better reporting AND that can really help you optimize your marketing campaigns!